FFmpeg incantations
Using FFmpeg magic to convert and process video and audio files on your computer.
FFmpeg is a complete, cross-platform solution to record, convert and stream audio and video
, and it’s used under the hood by large projects and software such as Youtube, VLC media player, Blender, and the Perserverance rover on Mars. (?!)
An incantation is a use of spells or verbal charms spoken or sung as a part of a ritual of magic; a written or recited formula of words designed to produce a particular effect
.
Using magical spells and charms gathered from StackOverflow to (hopefully) produce the desired effect on my audio and video files is exactly how I use FFmpeg.
Sometimes it works, sometimes it doesn’t. It’s extremely mysterious.
Here are a few incantations I’ve found to be effective … usually.
In the spellbook
FLAC to MP3
Use case: you have music in FLAC format because you are a connoisseur, but you need MP3 versions to load into your iTunes library so you can transfer them to your iPhone to play while you’re out and about or whatever.
Converting to MP3 uses the libmp3lame library. If your FFmpeg install doesn’t include libmp3lame, you’ll need to install a version that does include it.
Check your install for the libmp3lame library by running
ffmpegon the command line and looking for--enable-libmp3lamein the output.For Windows, the FFmpeg site recommends using builds from gyan.dev. The
ffmpeg-release-essentials.zipunder the Release Builds section includes libmp3lame.
FLAC to MP3 for a single file
ffmpeg -i input.flac -b:a 320k -map_metadata 0 -id3v2_version 3 output.mp3 -hide_bannerWhat’s happening there?
-i flags the input url or filename.input would be the actual name of your file, and output is the name of the file once converted.-b:a 320k sets the bitrate of the audio to 320kbps.-map_metadata 0 keeps all the metadata from the input file.-id3v2_version 3 uses ID3v2.3 tags for the metadata for best compatibility.-hide_banner hides all the extra FFmpeg info that is usually output.
Or convert all the FLAC files in a folder using a Bash script
for f in *.flac; do ffmpeg -i "$f" -b:a 320k -map_metadata 0 -id3v2_version 3 "${f%.*}".mp3 -hide_banner; done(I run Bash scripts in Git Bash, which came along with my Git-SCM install for Windows. It will be different if you’re using PowerShell or the Windows CMD prompt.)
Make an extremely compatible video
Use case: you’ve hooked up your Blu-Ray player to your network so you can play your videos on the TV instead of the computer, but your Blu-Ray player is old and doesn’t handle modern codecs or 5.1 surround sound audio or whatever just because.
ffmpeg -i input.mkv -c:v copy -c:a aac -q:a 2 -ac 2 -c:s dvd_subtitle output.mp4 -hide_bannerWhat’s that all about?
-c is short for codec, which is the name of a decoder or encoder.-c:v picks the codec for the video stream.-c:v copy makes a copy of the video stream instead of re-encoding it. (-c:v libx264 -crf 18 if you need to make sure it‘s going to use the H.264 codec)-c:a picks the codec for the audio stream.-c:a aac re-encodes the audio with the AAC codec.-q:a 2 uses a variable bitrate for the AAC audio. (0.1 is low, 10 is high)-ac 2 sets the number of audio channels to 2.-c:s dvd_subtitle chooses the codec for the subtitles. (Sometimes this is mov_text instead).mp4 converts the file to MP4 format.-hide_banner hides all the extra FFmpeg info that is usually output.
(My player likes AAC audio, doesn’t like 5.1 surround or multiple audio tracks.)
Doing this for your own old Blu-Ray player
- Find a file that does work with your old Blu-Ray player.
- Run
ffmpeg -i input.mkv -hide_bannerto get the details for that file, and use those details to figure out which codecs/etc are compatible. - Type up an incantation that will convert your file to match.
Converting all the video files in a folder with a Bash script
This code was used to convert a folder of HEVC-encoded files to H.264. (It took ages.)
for f in *.mkv; do ffmpeg -i "$f" -c:v libx264 -crf 18 -preset fast -vf format=yuv420p ./h264/"${f%.*}".mp4 -hide_banner; doneSave it as (for e.g.) convert.sh in the same folder as the files you want to to convert, and run it from command line. The quotes around the "$f" parts allow for filenames that include spaces.
Remove an audio track from a video
Use case: your networked Blu-Ray player doesn’t always like multiple audio tracks.
Here’s how to make a version of a video that has the one audio track that you want.
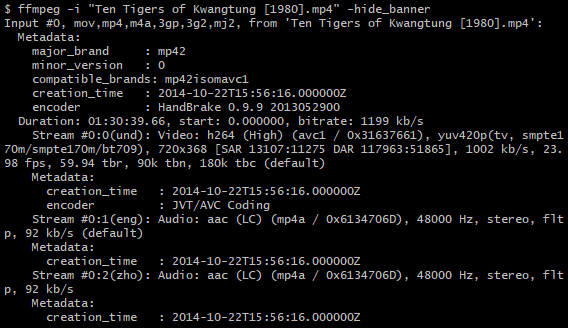
Step 1: find out the references for the video and audio stream
ffmpeg -i input.mkv -hide_bannerThis command will output stats for the input file, including something like this.
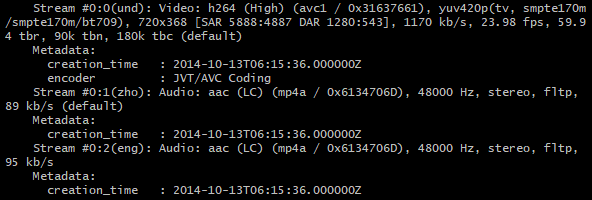
Here we can see the video stream is at Stream #0:0, with Chinese and English language audio tracks at Stream #0:1(zho) and Stream #0:2(eng). (Not pictured: Stream #0:4(eng) for the subtitles.)
Step 2: use -map to pick the streams to be kept
ffmpeg -i input.mkv -c:v copy -c:a aac -q:a 2 -ac 2 -map 0:0 -map 0:2 -map 0:4 -c:s dvd_subtitle output.mp4 -hide_banner-map 0:0 and -map 0:2 and -map 0:4 select the streams to be kept in the output. (In this example, the video, the English audio, and the English subtitles are kept.)
Converting a recording into versions of different quality
Use case: you recorded a mixtape as a WAV file, and you want to make a 128kbps MP3 to share with your buddies because no one is going to listen to your mix if they have to download a 600 MB WAV file.
ffmpeg -i input.wav -b:a 128k -map_metadata 0 -id3v2_version 3 output.mp3 -hide_banner-b:a 128k sets the bitrate of the audio to 128kbps.-map_metadata 0 keeps all the metadata from the input file.-id3v2_version 3 uses ID3v2.3 tags for the metadata for best compatibility.-hide_banner hides all the extra FFmpeg info that is usually output.
Why not use Mixcloud or Soundcloud to share it? I do that, too. It’s good to have your own copies, though, in case Mixcloud or Soundcloud shut down, or turn evil, or get hacked, or get banned in your locality (Edit 2022/10: or limit you to ten mixes). (Also—pretty good bet that Mixcloud and Soundcloud use FFmpeg in the background, yes?)
Join separate audio files into one big file
Use case: you have a mix CD with multiple tracks where the audio all flows together, and you want to copy it on to your computer before the cat scratches up the CD, but your other media player on the computer (ahem, VLC) puts a gap between each track during playback and it just ruins the vibe, man.
Step 1: make a list of the files
In the folder where all the files are, make a file named list.txt (for example) that holds a list of all the separate audio files.
Example list.txt
file '01 Track 1.wav'
file '02 Track 2.wav'
file '03 Track 3.wav'
file '04 Track 4.wav'
file '05 Track 5.wav'
Use quotes around the file names if there are spaces. And even if there aren’t spaces. FFmpeg is a bit picky with this part.
Step 2: use that list to process the files into one big file
Run this command in the same folder as list.txt.
ffmpeg -f concat -safe 0 -i list.txt -c:a copy output.wav -hide_banner-f concat is picking the Virtual concatenation script demuxer, which reads a list of files and other directives from a text file
.-safe 0 sets FFmpeg to accept unsafe file names in list.txt. An example of an unsafe file name is one that starts with a number, so yes, FFmpeg is a bit picky with this part. Use -safe 1 to reject unsafe file names. (More on that here) -i list.txt is saying that the input files are those listed in list.txt.-c:a copy is making a copy of the audio files instead of re-encoding them.-hide_banner hides all the extra FFmpeg info that is usually output.
Notes
- Use
dir *.flac > list.txtto make alist.txtwith all the FLAC files listed in order, then edit each line to prepend thefileand surround the file name with's. - Escape any
's in the file name with'\''. (See Filename quoting in ffmpeg concat on StackExchange) - If your output file is FLAC format and the length of the file after concatenation is incorrect, try
-c:a flacinstead of-c:acopy. (See FFMPEG: flac audio file duration in metadata is 0 on StackOverflow)
Adding specific metadata to the big file
(Actual example)
ffmpeg -safe 0 -f concat -i ./list.txt -c:a flac -metadata album="The Prodigy Presents The Dirtchamber Sessions Vol.1" -metadata artist="Liam Howlett" -metadata date="1999" -id3v2_version 3 "Liam Howlett - The Prodigy Presents The Dirtchamber Sessions Vol.1.flac" -hide_bannerSee a list of FFmpeg metadata options. (wiki.multimedia.cx)
Video stabilisation
Use case: stabilising a bumpy video?
I have been trying to make fancy time-lapse videos using a Raspberry Pi to control a DSLR. The initial videos were not that exciting, and they were also a bit bumpy.
The bumpiness can be mostly fixed with image stabilisation. I’m still working on making the videos exciting.
Step 1: analyse the video
ffmpeg -i input.mkv -vf vidstabdetect -f null -Step 1 produces a transforms.trf file containing stabilisation data.
Step 2: use the analysis to process it
ffmpeg -i input.mkv -vf vidstabtransform output.mkvStep 2 uses the data in transforms.trf to produce a stabilised video.
See a better explanation of the process in Video Stabilization With `ffmpeg` and `VidStab`. (paulirish.com)
Here’s a before-after comparison of one of my time-lapse videos.
Producing different video formats for self-hosting videos
Video format support varies among browsers, so a web page can provide video in multiple formats.
(Wikipedia quote)
Providing multiple formats gives a better chance of your self-hosted video working for your viewers.
Here’s how I did the formats for the video stabilisation demonstration above, making OGV, WEBM, and MP4 files from the original MOV.
(Updated 2024/06/25: changed the MP4 conversion for better compatibility with Safari/iOS)
# Output resized versions in ogv, webm, and mp4 format, with mp4 optimised for iOS/Safari (http://trac.ffmpeg.org/wiki/Encode/H.264)
# -vf "scale=640:-1" means "make it 640 pixels wide, keeping the same proportions"
# use -vf "scale=w=640:h=-2" if you're getting a "height not divisible by 2" error

ffmpeg -i Video-stabilisation-before-after.mp4 \
-vf "scale=640:-1" -c:v libtheora -q:v 7 -c:a libvorbis -q:a 5 Video-stabilisation-before-after_640.ogv \
-vf "scale=640:-1" -c:v libvpx-vp9 -b:v 1M -c:a libopus -b:a 128k Video-stabilisation-before-after_640.webm \
-vf "scale=640:-1" -c:v libx264 -profile:v high -level:v 4.1 -pix_fmt yuv420p -crf 18 -preset slow -c:a aac -b:a 128k -movflags +faststart Video-stabilisation-before-after_640.mp4

# Output the first frame of the video file to use as a poster for the video tag

ffmpeg -i Video-stabilisation-before-after.mp4 -vframes 1 -vf "scale=640:-1" Video-stabilisation-before-after_640_poster.jpg
The MP4 conversion has a few extras.
-profile:v high -level:v 4.1: set theH.264profile to ‘high’ and the level to 4.1 (combatibility settings)-movflags +faststart: allows the video to start playing before fully downloaded.
The HTML to embed in the page looks like this.
<video controls loop muted preload="auto" poster="https://files.opie-etc.com/assets/2022/08/Video-stabilisation-before-after_640_poster.jpg" width="640" height="214" title="Video stabilisation example">
	<source src="https://files.opie-etc.com/assets/2022/08/Video-stabilisation-before-after_640.mp4" type="video/mp4">
	<source src="https://files.opie-etc.com/assets/2022/08/Video-stabilisation-before-after_640.webm" type="video/webm">
	<source src="https://files.opie-etc.com/assets/2022/08/Video-stabilisation-before-after_640.ogv" type="video/ogg">
	<p>Your browser doesn’t support this video. <a href="https://files.opie-etc.com/assets/2022/08/Video-stabilisation-before-after_640.mp4">Download and watch offline</a>.</p>
</video>
References
FFmpeg reference
FFmpeg Documentation (ffmpeg.org)
FLAC to MP3
Convert .flac to .mp3 with ffmpeg, keeping all metadata (stackoverflow.com)
AAC encoding quality
Encode/AAC (trac.ffmpeg.org)
Joining separate files into one big file
Concatenating Videos Using FFmpeg (baeldung.com)
Safe file names (baeldung.com)
Video stabilisation
Video Stabilization With `ffmpeg` and `VidStab`. (paulirish.com)
Available options with vidstab filters (github.com/georgmartius)
Producing different video formats
A Brief Theora and Vorbis Encoding Guide (trac.ffmpeg.org)
Creating multiple outputs (trac.ffmpeg.org)
H.264 Video Encoding Guide (for the mp4 format, trac.ffmpeg.org)
Convert to WebM (gist.github.com/Vestride)
ffmpeg – Convert MP4 to WebM, poor results (stackoverflow.com)
Installation
I can’t remember how I installed FFmpeg on my main computer. It might have been bundled with an ImageMagick install. Anyway, it just worked.
For Windows, the FFmpeg site recommends using builds from gyan.dev.
I have FFmpeg working on a Raspberry Pi, and at some point I’ll tidy up and publish the notes I made on how much I enjoyed that installation process.